A while back I mentioned a treasure chest looking box I was restoring for a friend. I finally finished it and he was so happy with the way it turned out.
My advice to you is to avoid minuscule details AT ALL COSTS. Does this mean I’m suggesting you shouldn’t do projects with small details? YES. Are you going to want to do one anyway? Probably. In those instances where you (and I) are crazy enough to take on such a stupid thing, work smarter and minimize your frustrations.
At first I decided it would be great to try to work around the hardware while it was on the box because I thought I wouldn’t be able to get it off. Then I got really frustrated and realized maybe I should at least try taking it off. My life became SO much easier.
But anyway, here are some before pictures


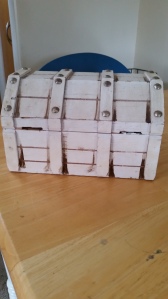

I got a lot of people telling me that they thought it looked okay beforehand but up close the stained areas look pretty whack and careless. The hardware definitely needed to be cleaned too.
Also, notice how the left hinge is missing and part of the felt in the box is messed up
The first thing I did was sand the box down really well but I didn’t bother getting all the way down to the wood because I figured the General Finishes stain would be able to cover it up. This is what the box looked like after the first coat

Then after the second coat

I was using a rag and trying to work around the hardware but I couldn’t get the stain to even out and not look janky. At first I was also using q-tips to get the cracks (which I’ll admit was pretty resourceful), but it wasn’t getting the results I was looking for.
So then I said screw it and grabbed a screwdriver (no pun intended) and pried all the itty bitty nails off.
This is what the box looked like after I got all the hardware off and sanded it down some more.

Before I took everything off I was also trying to clean the hardware with a baking soda and vinegar paste which needless to say it was a pain in the ass. But I found it hilarious that I was brushing the skeletons teeth :p

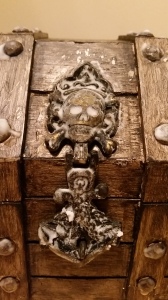

Once I took the hardware off I tried to soak everything in a baking soda and vinegar mixture then scrub the dinginess off but it wasn’t really achieving the look I wanted so I pulled out the Rub-N-Buff in antique gold. It looks soooo much better and still has some of the black showing through.

Once I got the hardware off I also got foam brushes to make the stain look more even as well as to get in the cracks easier.


I bought new hinges since one was missing and cut away the velvety liner along the two separate pieces to make it look cleaner.


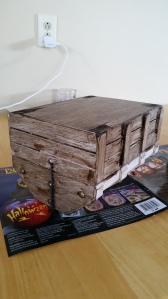
Here is the box all put back together.

This actually turned out to be a fun little project and I made some money on it which made it even better. Again I don’t recommend torturing yourself with tiny little detailed projects, but I GUESS it might turn out okay.
This summer hopefully I’ll be able to flip some furniture as well as doing furniture for friends and family on a larger scale than this box.
If you liked this post I would appreciate it if you would be so kind to pass it along.
See You Around!
Lauren ❤

Omg. You did an amazing job on that chest. I love it!! I will share your post on my next post!
LikeLiked by 1 person
Thanks so much! I already have a friend that wants me to find and fix one up for him too haha
LikeLike
Lauren fantastic job! I too would like to flip some furniture this summer (i.e. after we move and I have more free time). We should collaborate! xo
LikeLiked by 1 person
[…] share some updates my next post. In the meantime, my blogger friend, Lauren, from Flip This Rental, restored the most awesome treasure chest. It reminds me of watching The Goonies and finding hidden treasures! Check it […]
LikeLike
You did a great job! It looks wonderful 🙂
LikeLiked by 1 person
Thanks!! 🙂 having it done is making me want to stain my china cabinet but whenever I have time to pick up more stain the store that carries general finishes near me isn’t open 😦
LikeLiked by 1 person
I love the way it turned out! It looks great!!
LikeLiked by 1 person
Thank you!! 😊
LikeLiked by 1 person
So are the teeth clean ? 😀
This is really a job well done!It’s looks super neat! 🙂
LikeLiked by 1 person
As clean as they’re going to get! Thank you 🙂
LikeLiked by 1 person
😀
LikeLiked by 1 person
Oh, I love this, and I don’t even really like skulls, but I love wood and trunks! 😊 You did an incredible job!
LikeLiked by 1 person
Thank you so much! 😊
LikeLiked by 1 person